Sensors
On this page you connect two sensors and output their data to the portal. First the SHT31 (cabinet climate), then the thermistor (heater temperature). This is the "read data" step before adding control logic.
The principle of working with the core is simple: your code in loop() writes fresh readings to s_link.telemetry.* fields, and the facade publishes them to the cloud every telemetryPeriodMs from Config. You do not need to call publish manually.
Telemetry fields
For our cabinet, three fields are used (index [0] — the first and only chamber):
| Field | What it stores | Flag in Config |
|---|---|---|
s_link.telemetry.airTempC[0] |
air temperature, °C | hasAirTemp |
s_link.telemetry.airHumidityPct[0] |
air humidity, % | hasAirHumidity |
s_link.telemetry.heaterTempC[0] |
heater temperature, °C | hasHeaterTemp |
These three flags are enabled right here, in Config (see the full listing at the end of the chapter). A flag tells the portal and the app that the device has such a sensor: without it the cell will not appear on the card.
Rule: sensor code must not block loop()
The idryer-core facade services Wi-Fi and MQTT in the same loop(). Therefore, when reading sensors you cannot call delay() — the pause breaks the network session. Sensors are polled on a timer, and the ready value is simply read. Ready-made drivers from the ecosystem are already structured this way.
Step 1. SHT31: cabinet climate
You do not need to write the SHT31 driver from scratch — a ready-made Sht31ClimateSensor class lives in this chapter's example, example/09-cabinet. It uses the robtillaart/SHT31 library and reads the sensor without blocking.
-
Add the SHT31 library to
lib_depsin yourplatformio.ini: -
Copy the four driver files into your
src/folder: -
Connect the sensor via I2C (see Wiring diagram) and read it in
src/main.cpp:
#include <Wire.h>
#include <iDryer.h>
#include "Sht31ClimateSensor.h"

static Sht31ClimateSensor s_climate(&Wire);
static bool               s_climateOk = false;

void setup() {
    Serial.begin(115200);
    Wire.begin(8, 9);                 // SDA, SCL — pins on your board
    s_climateOk = s_climate.begin();  // auto-finds address 0x44 or 0x45
    s_link.begin();
    // The portal unlinked the device: erase the secret, wait for a new pairing.
    s_link.onCommand("revoke", [](JsonObjectConst) { s_link.handleRevoke(); });
}

void loop() {
    s_link.loop();

    if (s_climateOk) {
        s_climate.tick(millis());
        SensorReading r = s_climate.get();
        if (r.ok) {
            s_link.telemetry.airTempC[0]       = r.temperature;
            s_link.telemetry.airHumidityPct[0] = r.humidity;
        }
    }
}
The driver returns one snapshot of readings as the SensorReading structure from sensor_reading.h:
struct SensorReading {
    float    temperature = NAN;   // °C, NAN if there is no value
    float    humidity    = NAN;   // % RH, NAN if there is no value
    float    pressure    = NAN;   // hPa, for future sensors
    uint32_t ts_ms       = 0;     // millis() at the moment of reading
    bool     ok          = false; // true if temperature and humidity are valid
    int      err         = 0;     // error code, 0 — no error
};
After flashing, cabinet temperature and humidity will appear on the portal — this is the first feedback from the device.
Step 2. Thermistor: heater temperature
I do not have a ready-made thermistor class for ESP32, so we write the reading ourselves directly in src/main.cpp. The thermistor is connected to an ADC pin through a voltage converter (see Wiring diagram): the controller measures the voltage at the midpoint, the thermistor resistance is calculated from it, and then the temperature.
#include <math.h>

static const int   THERM_PIN  = 2;         // ADC pin
static const float SERIES_R   = 4700.0f;   // divider resistor, Ohm
static const float NOMINAL_R  = 100000.0f; // thermistor resistance at 25 °C, Ohm
static const float NOMINAL_T  = 25.0f;     // °C
static const float BETA       = 3950.0f;   // B-coefficient from thermistor datasheet

// Returns heater temperature in °C.
static float readHeaterTempC() {
    int   raw = analogRead(THERM_PIN);          // 0..4095 on ESP32
    float v   = (float)raw / 4095.0f;           // fraction of full scale
    float r   = SERIES_R * (1.0f - v) / v;      // thermistor resistance, Ohm
    // Steinhart–Hart equation in the B-parameter form — see Wikipedia:
    // https://en.wikipedia.org/wiki/Steinhart%E2%80%93Hart_equation
    float tK  = 1.0f / (1.0f / (NOMINAL_T + 273.15f) + logf(r / NOMINAL_R) / BETA);
    return tK - 273.15f;
}
In loop() write the result to telemetry alongside SHT31 reading:
This is simplified reading — adjust parameters for your thermistor
The NOMINAL_R and BETA constants depend on the specific thermistor — get them from its datasheet (common household thermistor — Generic 3950, 100 kΩ). The divider formula corresponds to the circuit in Wiring diagram: thermistor to 3.3V, resistor to GND. With a different layout, the formula changes. The ADC on ESP32 is nonlinear, so for accurate measurements readings are calibrated — in production iDryer controllers a thermistor table is used for this (library Thermistor).
Checking the thermistor with a multimeter — Checking a thermistor.
Step 3. No sensors at hand? Demo mode
You can walk the whole path up to the card without hardware: the readings will be computed by a cabinet model. Copy the demo_sensors.h file from the same example:
and add a build flag to platformio.ini:
Both branches are hidden behind a single function, and loop() does not know where the values came from:
static void readSensors() {
#ifdef DEMO_SENSORS
    demoSensors(s_link.telemetry);
#else
    // reading SHT31 and the thermistor — as above
#endif
}
The model behaves like a real cabinet: the room slowly fluctuates around 24 °C, a heater that is on warms the air, a heater that is off lets it cool down, and humidity drops while heating. The model reads the heating power from telemetry, so the logic from the Heating control chapter sees a response and the hysteresis works. The screenshots in this section were made exactly this way.
For a real device the flag is not set: then the branch with real sensors is built.
Complete src/main.cpp after this chapter
Below is the entire file. New lines relative to the previous chapter are marked // ← chapter 5; the rest is unchanged.
What was — src/main.cpp after chapter 4
#include <iDryer.h>

static const iDryer::Config CFG = {
    .deviceType        = iDryer::DeviceType::Unknown,   // your own device: the card is built by the manifest
    .unitsCount        = 1,
    .telemetryPeriodMs = 5000,
    .statusPeriodMs    = 10000,
    .hardwareVersion   = "1.0",
    .firmwareVersion   = "0.1.0",
    .model             = "DIY Storage Cabinet",
};
static iDryer::Link s_link(CFG);

void setup() {
    Serial.begin(115200);
    s_link.begin();
    // The portal unlinked the device: erase the secret, wait for a new pairing.
    s_link.onCommand("revoke", [](JsonObjectConst) { s_link.handleRevoke(); });
}

void loop() {
    s_link.loop();
}
#include <iDryer.h>
#include <Wire.h>                  // ← chapter 5
#include <math.h>                  // ← chapter 5
#include "Sht31ClimateSensor.h"    // ← chapter 5
#include "demo_sensors.h"    // ← chapter 5: readings without sensors (-DDEMO_SENSORS=1)

static const iDryer::Config CFG = {
    .deviceType        = iDryer::DeviceType::Unknown,   // your own device: the card is built by the manifest
    .unitsCount        = 1,
    .hasAirTemp        = true,     // ← chapter 5
    .hasAirHumidity    = true,     // ← chapter 5
    .hasHeaterTemp     = true,  // ← chapter 5
    .telemetryPeriodMs = 5000,
    .statusPeriodMs    = 10000,
    .hardwareVersion   = "1.0",
    .firmwareVersion   = "0.1.0",
    .model             = "DIY Storage Cabinet",
};
static iDryer::Link s_link(CFG);

// ← chapter 5: SHT31 climate sensor
static Sht31ClimateSensor s_climate(&Wire);
static bool               s_climateOk = false;

// ← chapter 5: heater thermistor
static const int   THERM_PIN  = 2;
static const float SERIES_R   = 4700.0f;
static const float NOMINAL_R  = 100000.0f;
static const float NOMINAL_T  = 25.0f;
static const float BETA       = 3950.0f;

static float readHeaterTempC() {
    int   raw = analogRead(THERM_PIN);
    float v   = (float)raw / 4095.0f;
    float r   = SERIES_R * (1.0f - v) / v;
    float tK  = 1.0f / (1.0f / (NOMINAL_T + 273.15f) + logf(r / NOMINAL_R) / BETA);
    return tK - 273.15f;
}

// ← chapter 5: sensors or, with -DDEMO_SENSORS=1, the cabinet model
static void readSensors() {
#ifdef DEMO_SENSORS
    demoSensors(s_link.telemetry);
#else
    if (s_climateOk) {
        s_climate.tick(millis());
        SensorReading r = s_climate.get();
        if (r.ok) {
            s_link.telemetry.airTempC[0]       = r.temperature;
            s_link.telemetry.airHumidityPct[0] = r.humidity;
        }
    }
    s_link.telemetry.heaterTempC[0] = readHeaterTempC();
#endif
}

void setup() {
    Serial.begin(115200);
    Wire.begin(8, 9);                 // ← chapter 5  (SDA, SCL — pins on your board)
    s_climateOk = s_climate.begin();  // ← chapter 5
    s_link.begin();
    // The portal unlinked the device: erase the secret, wait for a new pairing.
    s_link.onCommand("revoke", [](JsonObjectConst) { s_link.handleRevoke(); });
}

void loop() {
    s_link.loop();

    readSensors();   // ← chapter 5
}
Checking the result
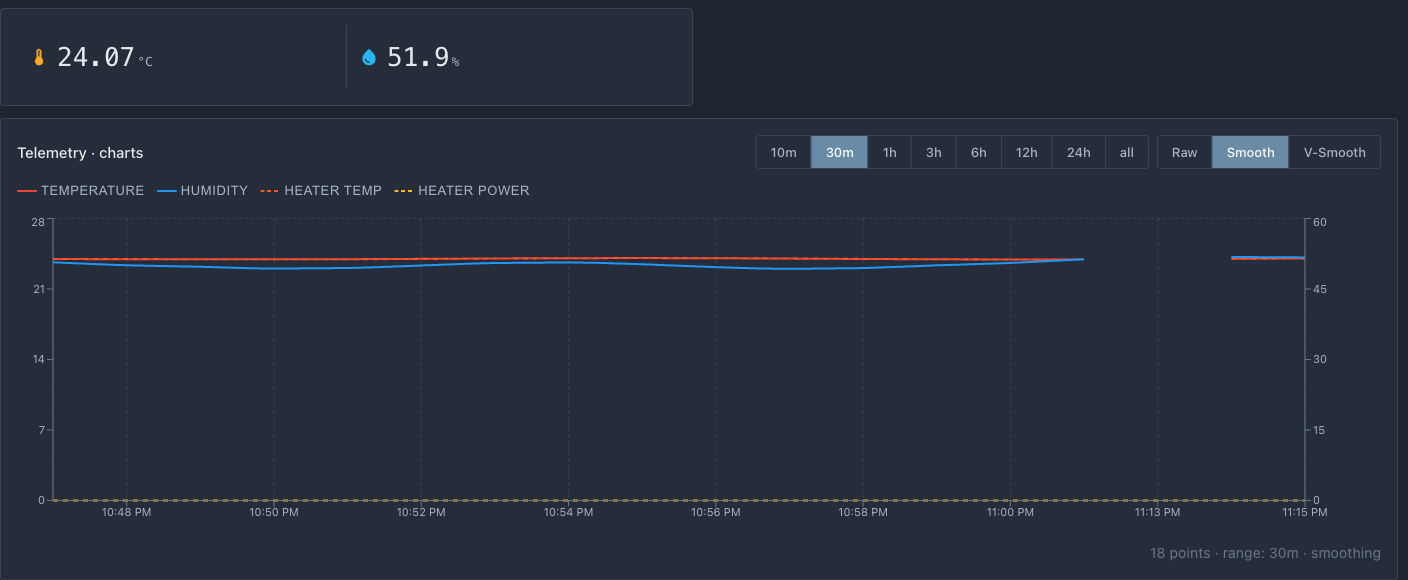 Readings on the card and the telemetry chart. The heater temperature is a separate line on the chart. The menu at the bottom of the page is still empty — the next chapter takes care of it.
After this step, three values should be displayed on the portal:
- air temperature in the cabinet;
- humidity in the cabinet;
- heater temperature.
If readings "float" or are clearly incorrect:
- check common ground and wiring (noise from power wires) — Wiring mistakes;
- check the divider resistor rating and thermistor type;
- make sure SHT31 responds on I2C (correct address and lines).
Diagnostics for "sensor shows garbage" — Checking a thermistor and Common mistakes.
What's next
You have data from sensors. Now we will describe device settings (target temperature, hysteresis) in YAML Menu so they can be changed from the portal and stored in memory.