Storage Link — quick guide
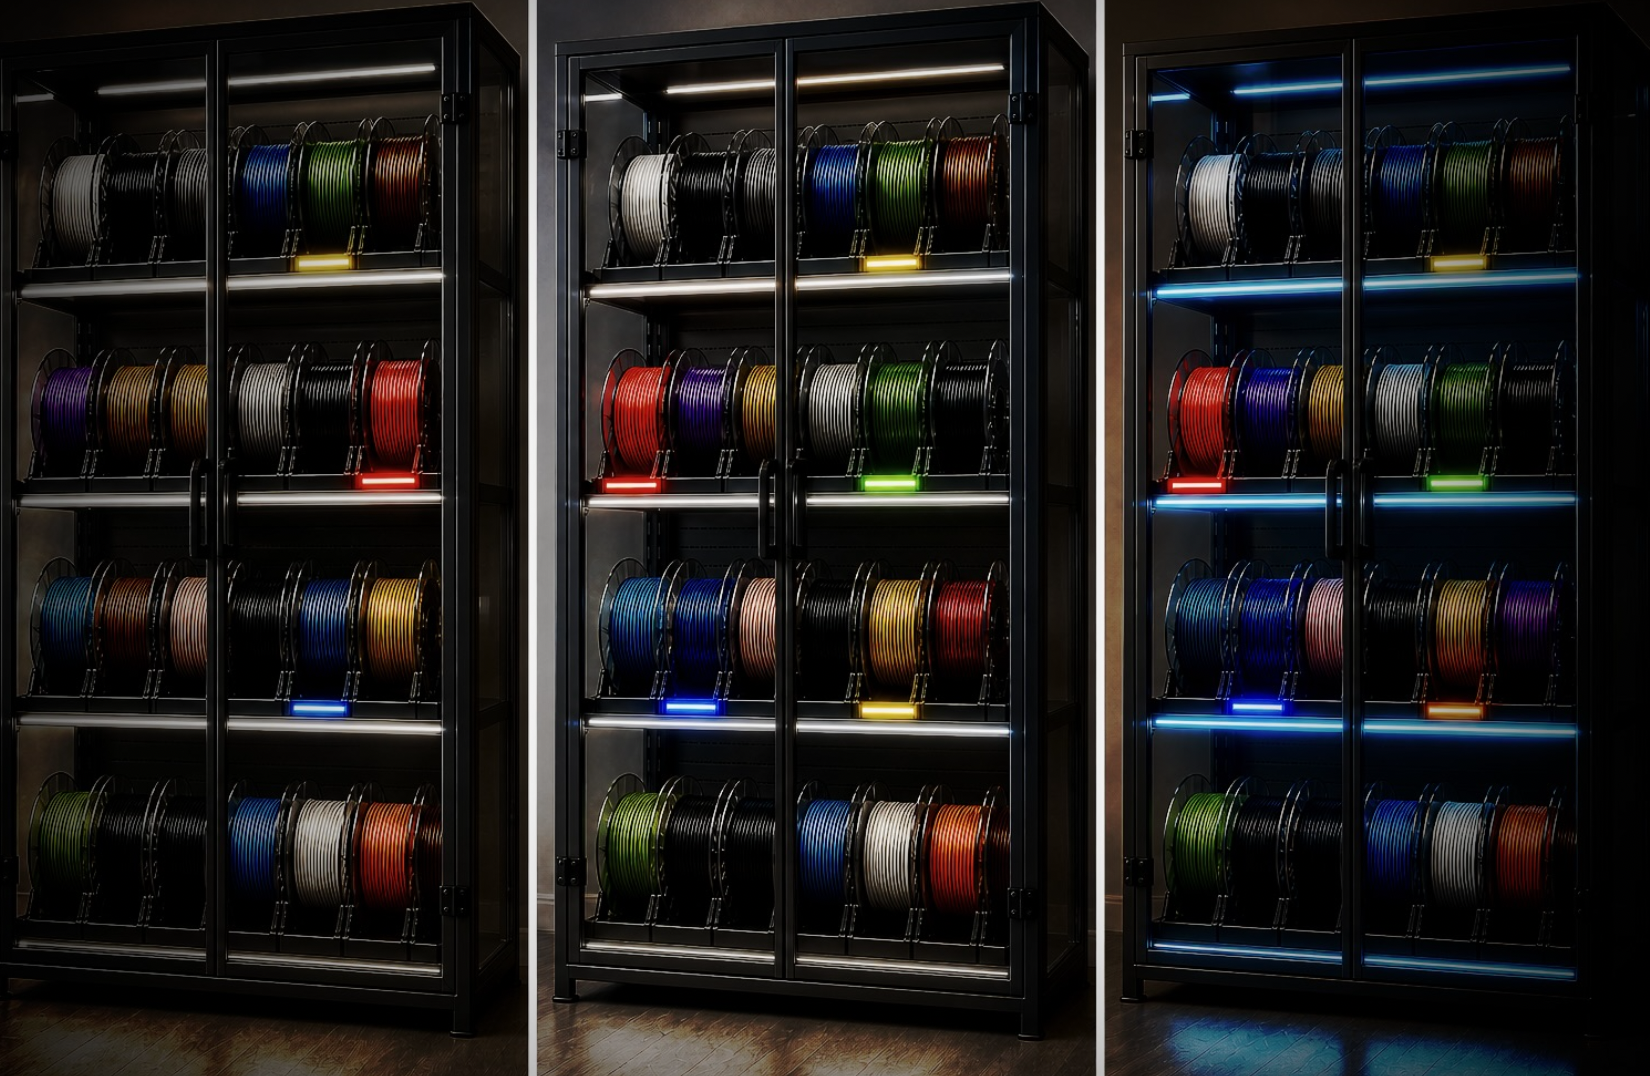
Storage Link is an ESP32-based module that turns an addressable LED strip into a filament spool storage indicator and can optionally publish temperature and humidity from an SHT31 sensor.
- Connects to Wi-Fi and links the device to portal.idryer.org.
- On command from the cloud or local app, highlights a spool slot for a specified time in a specified color.
- Publishes temperature and humidity when an SHT31 sensor is installed.
Knowledge about the storage rack and spools lives in the external application. The firmware works as a simple executor: "highlight slot N with color C for T seconds". This lets you attach the strip to any rack and describe it in the portal independently of the firmware.
Supported boards
| Board | |
|---|---|
| ESP32-C3 DevKitM-1 | ✅ |
| ESP32-C3 Super Mini | ✅ |
| Seeed XIAO ESP32-S3 | ✅ |
| Waveshare ESP32-S3-Zero | ✅ |
Any other ESP32-C3 or ESP32-S3 board can be used if it has a free GPIO for the LED strip data line and a pair of GPIOs for I2C. Check the manufacturer's pinout.
Wiring
Never connect or disconnect wires while power is applied.
Storage Link controls the strip through one signal GPIO (DATA) and can optionally read the SHT31 over I2C.
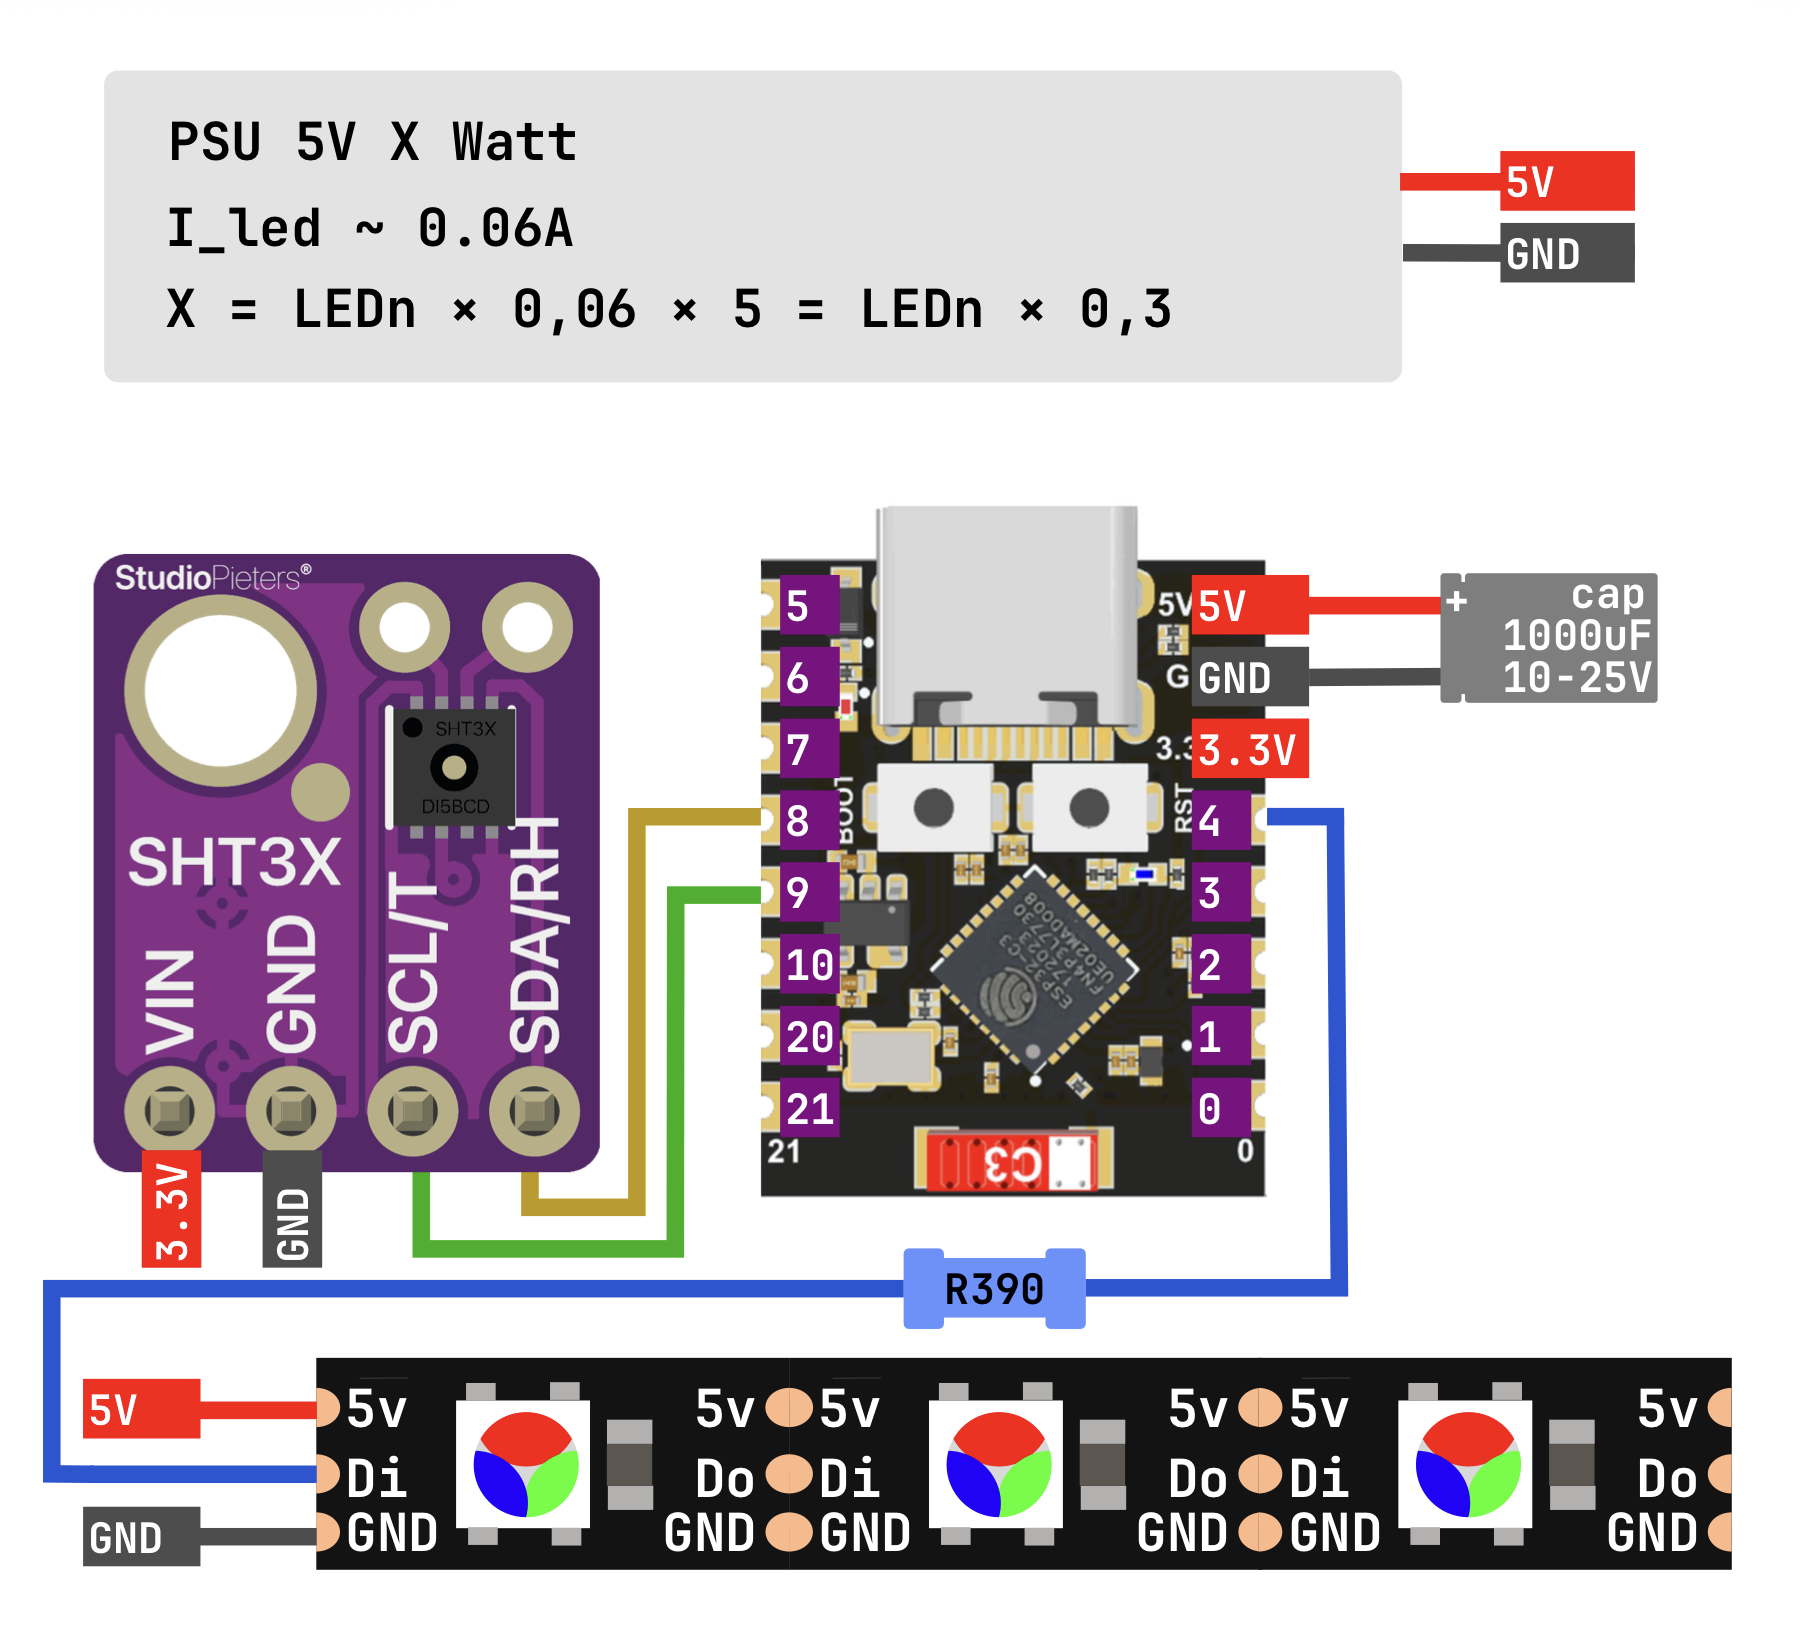
LED strip power
The strip and ESP must be powered from a supply rated for the strip's actual load.
- On many ESP boards, the
5V(VBUS) pin is connected directly to the USB connector. If your USB power supply has enough current headroom for the strip load, you may power the ESP and strip in parallel from it. - If there is not enough current headroom, power the strip from a separate 5 V PSU. The PSU ground must be connected to the ESP
GND; without a common ground, theDATAsignal will not work.
In both cases, set psu_ma in the menu to the current your 5 V power supply can actually deliver. This is not the desired current, but the PSU's rated output. FastLED uses this value to limit total brightness so the limit is not exceeded.
Good assembly practices
These parts are not required for startup, but they eliminate typical addressable strip issues such as skipped pixels, first LED glitches, and voltage drops during power-on.
- Resistor in the
DATAline. Place a300-500 Ohmresistor (typically390 Ohm) in series between the ESP GPIO and the stripDIN, physically as close to the strip as possible. It damps signal reflections and protects the first chip on the strip. - Electrolytic capacitor on power. Place a
1000 uFcapacitor rated for16 Vbetween+5VandGNDat the strip power input (25 Vis also fine,10 Vis the minimum). It smooths current surges during sharp turn-ons. -
Common ground wire sized for PSU current. The ESP-strip-PSU ground wire must be sized for the strip's peak current. A guideline for short wires (up to ~1 m):
PSU current Cross-section AWG up to 3 A 0.5 mm²AWG 20up to 5 A 0.75 mm²AWG 18Use the same cross-sections for the
+5Vline to the strip. For long strips, feed power from both ends.
Signal connections
GPIO values depend on the board.
ESP32-C3 DevKitM-1 and ESP32-C3 Super Mini
| ESP | Purpose |
|---|---|
GPIO4 |
addressable strip DATA |
GPIO8 |
SDA (SHT31, optional) |
GPIO9 |
SCL (SHT31, optional) |
GND |
common ground with strip and PSU |
Seeed XIAO ESP32-S3
| ESP | Purpose |
|---|---|
GPIO2 |
addressable strip DATA |
GPIO5 |
SDA (SHT31, optional) |
GPIO6 |
SCL (SHT31, optional) |
GND |
common ground with strip and PSU |
Waveshare ESP32-S3 Zero
| ESP | Purpose |
|---|---|
GPIO4 |
addressable strip DATA |
GPIO8 |
SDA (SHT31, optional) |
GPIO9 |
SCL (SHT31, optional) |
GND |
common ground with strip and PSU |
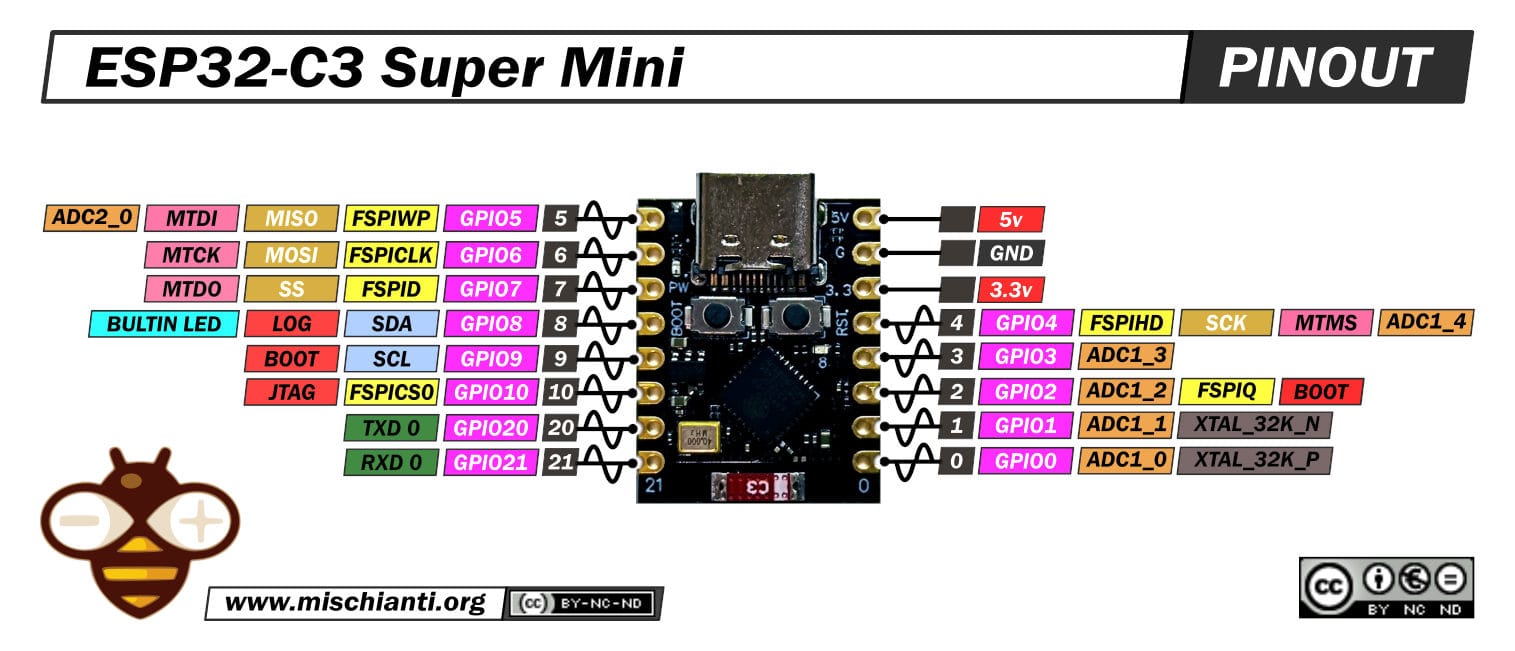
Board pinouts
ESP32-C3 Super Mini:
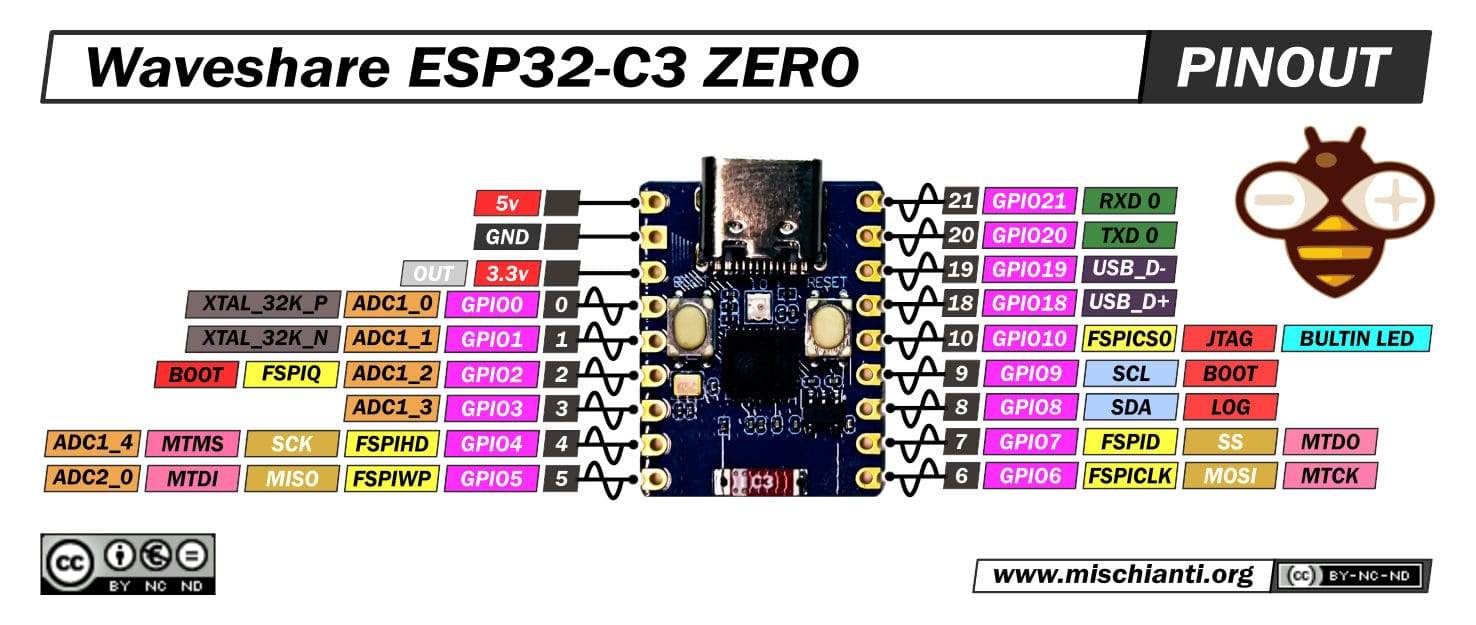
Waveshare ESP32-S3-Zero:
Optional SHT31 sensor
The sensor is needed only if you want this device to publish temperature and humidity. Storage Link starts and works with the strip the same way with or without the sensor. If the sensor is not installed, temperature and humidity are simply not sent.
- Bus: I2C on the corresponding board's
SDA/SCL. - Address:
0x44or0x45(the firmware detects it automatically at startup).
Flashing via web flasher
The web flasher is available at install.idryer.org.
- Connect Storage Link to a computer USB port.
- Open install.idryer.org and click Storage Link.
- Select your board variant.
- Click Connect and select the serial port. If the device is not detected, hold the
BOOTbutton on the board and briefly pressRST. - Click Install. The flasher will write the firmware.
- When flashing is complete, the Wi-Fi setup wizard will open.
Wi-Fi setup
After flashing, the Improv wizard opens automatically in the Serial port.
- Enter the SSID and password for your 2.4 GHz network.
- Wait for the Connected status.
If the wizard did not open, unplug USB and connect again with Connect without flashing again.
ESP32-C3 and ESP32-S3 support only 2.4 GHz Wi-Fi. 5 GHz networks do not work.
Linking to the portal
- On the flasher page, click Connect and Claim. A claim command will be sent to the device.
- After a few seconds, a PIN will appear on the page. The PIN is valid for about 5 minutes.
- Open portal.idryer.org -> Add device -> enter the PIN.
- After successful linking, the device will appear in the list as online.
If the PIN does not appear or linking fails, repeat the claim, or delete the device in the portal and try again.
LED strip setup
Parameters are set through the device configuration menu. Some are applied immediately, while others only after reboot.
| Parameter | Values | Default | Applied |
|---|---|---|---|
led_count |
1..300, step 1 |
120 |
immediately |
psu_ma |
500..20000 mA, step 100 |
5000 |
immediately |
| strip type | selected from available menu options | WS2812B |
after reboot |
| color order | GRB, RGB, BRG, BGR |
GRB |
after reboot |
language |
ru / en |
en |
immediately |
Basic checklist after the first startup:
- Set
led_countto the actual number of pixels on the strip. - Set
psu_mato the rated 5 V PSU current in milliamps. - Select the type of strip you have installed.
- Select the color order. The default is
GRB. If red and green are swapped or the color is wrong, try the other options. - Reboot the device; strip type and color order are applied only after reboot.
Expected result
- After claim, the device is visible online in the portal.
- A highlight command from the portal or app lights the selected slot on the strip for the specified time. A new command turns off the previous slot and lights the next one.
- If an SHT31 is installed, temperature and humidity are regularly updated in the portal.
- If no SHT31 is installed, climate readings are absent; this is normal.